Toolbox
The Toolbox on top allows you to switch between different types of view tools.
| Icon | Description | ||||||||||||||||||||||||
|---|---|---|---|---|---|---|---|---|---|---|---|---|---|---|---|---|---|---|---|---|---|---|---|---|---|
 |
Show Sidebar allows you to open or close the Sidebar on the left. | ||||||||||||||||||||||||
 |
Zoom in allows you to zoom in. If you selected the Thumbnails view in the Sidebar, the part on which you have zoomed is highlighted. | ||||||||||||||||||||||||
 |
Zoom allows you to enter a zoom percentage. | ||||||||||||||||||||||||
 |
Zoom out allows you to zoom out. | ||||||||||||||||||||||||
 |
Fit allows you to fit the complete design in the window in case you are zoomed in or out. | ||||||||||||||||||||||||
 |
Rotate allows you to rotate the design to the left or to the right. | ||||||||||||||||||||||||
 |
Mirror allows you to mirror the design. | ||||||||||||||||||||||||
 |
Zoom allows you to magnify a selected part of the file. If you click, you zoom in, if you ALT + click, you zoom out. | ||||||||||||||||||||||||
 |
Pan allows you to use panning on the design while zoomed in. To pan, hold down the left mouse button and move the mouse. If you selected the Thumbnails view in the Sidebar, the part on which you have zoomed is highlighted. You can move this highlighted part around by holding down the left mouse button and moving the mouse to change the panning zone. | ||||||||||||||||||||||||
 |
Notes allows you to add notes to the design. You can add
several types of notes:
After choosing the type of note, the Note window opens and you can write your comment. You can use Bold, Italic or Underline text formatting. You can add an extra area in the design to
your note by selecting Save Note saves the note and Remove Note removes it. Note: After saving a
note, it is no longer possible to remove it. Note: Selecting the
Cancel icon on the top right of the Note window will not
remove the note, it will only close the Note window. All notes are visible in the notes list on the Sidebar on the left if the Notes view is selected (by user or by page), and on the design itself. You can open the notes by clicking on the note in the Sidebar or by double clicking the visualization highlights in the design itself. Select Save Note to save your additional comment. Notes can
be edited if these 3 conditions are met:
|
||||||||||||||||||||||||
 |
The Densitometer allows you to measure separations. Select the exact
spot in the file where you want to measure the inks and the information window
appears: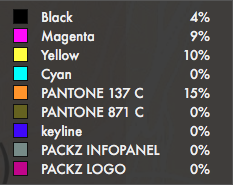
|
||||||||||||||||||||||||
 |
Measure allows you to measure:
|
||||||||||||||||||||||||
 |
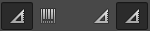
Detect Barcodes allows you to recognize and read barcodes. By dragging a rectangle on the barcode, the type and the value of the barcode is read: 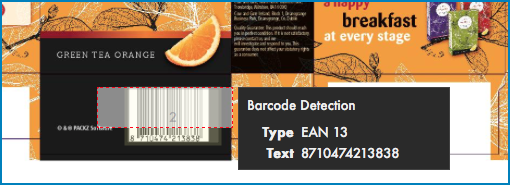
These are the supported barcodes:
Tip: You can select the value of the barcode and copy-paste it to another
software tool.
Attention: Barcodes should be 100% black or another dark separation. Do
not use a mixed color space, as the screening will interfere with the barcode
reading.
|


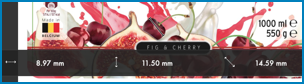
 and draw a line between the two points between which
you want to measure the distance.
and draw a line between the two points between which
you want to measure the distance.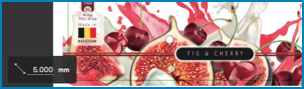
 and define a diameter in the box on the bottom left.
Next, draw a circle in the file. The diameter of the circle corresponds with the
diameter you have defined in the box. You can move the circle by dragging it to
another position. Everything outside the circle has a bigger measure than the
defined diameter. For example, this way you will know if a trap meets a certain
distance.
and define a diameter in the box on the bottom left.
Next, draw a circle in the file. The diameter of the circle corresponds with the
diameter you have defined in the box. You can move the circle by dragging it to
another position. Everything outside the circle has a bigger measure than the
defined diameter. For example, this way you will know if a trap meets a certain
distance.PROOFSCOPE stores four zoom levels (1x, 2x, 4x, 8x), with a maximum tile size of 2048 x 2048 pixels. The reason for this is to be able to store them in the database and to have reasonably sized tiles streamed to the browser. If the file is smaller than 2048 pixels at 96 dpi, the 1x tile corresponds to a 100% zoom, and you can zoom in 3 times. If the file is bigger than 2048 pixels at 96 dpi, the 1x tile corresponds to a <100% zoom (so the 1x fits in a tile), and you can zoom in 3 times.