Auto fill by table
With Auto fill by table you can look up information from a table and automatically fill in several text fields in the form with this information.
- Type: the type of the parameter.
- (variable) key: the name of the variable that will contain the parameter value. The variable will be addressed in the workflow with this name. This key needs to correspond to the key of the table column that you want to address to fill in the values.
- Label: the label in the KIOSK interface.
- Help text: the help text that will appear next to the label.
- Field options:
- Required?: if you select this checkbox, the field must be filled in. This will be indicated by an asterisk next to the label in KIOSK.
- Default: the default value of the field.
- Text in background: the background text.
- Collection: the collection in the database you want to
retrieve values from. Options:
- Custom objects: if you select this option, the suggestions are retrieved from the customs object collection in the database.
- Dataconnector: if you select this option, the suggestions are retrieved from an external data source (for example DATALINK).
- Jobs: if you select this option, the suggestions are retrieved from the Jobs collection in the database. You can use dot notation.
- Start From DBIO: if you select this option, the suggestions are retrieved from the data that is collected from a workable that was created by a workflow that starts with the Start from DBIO and sets a reply with the Set DBIO Reply.
- Custom object name (only in case of Custom objects): the name of the custom object. For example, if you have a database collection customobjects.customers, the custom object name is customers.
- Connector (only in case of Dataconnector): here you can specify the connector.
- Table name (only in case of Dataconnector): here you can specify the name of the table you want to use to retrieve data for auto fill suggestions.
- Columns: the columns you want to add to the table to
retrieve data from. Select
 to open the Manage columns
tab.
to open the Manage columns
tab.- Select + or Add column to add a column.
- Select
 to drag the column to another
position.
to drag the column to another
position. - Select
 to remove the column.
 - Select
 to close the tab.
- type: the column type. Depending on the type you
select, the sort and search options will differ. Options:
- text: if you select this type, the column content will be interpreted as text.
- number: if you select this type, the column content will be interpreted as a number.
- date (ISO-format): if you select this type, the column content will be interpreted as a date.
- Title: the title of the column that is displayed on the column header.
- Key (path): the key of the database collection that you want to display in the column. The key should correspond to the key of the text fields in the form you want to fill. The key can also be an array.
- Sortable: if you select this checkbox, you can sort the content in the column.
- Searchable: if you select this checkbox, a search field appears and you can search the content in the column.
- Width: the column width.
- Maximum Rows: the maximum number of rows in your table.
- only selectable: if you select this checkbox, you will only be able to select an item from a table. It will not be possible to enter a value in the field. Select this option to prevent that a value is entered that does not exist.
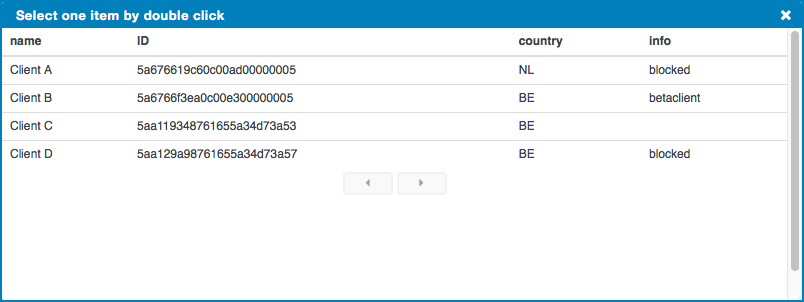
Example
You also have a customobjects database collection that contains the collection customers (customobjects.customers). This collection contains a record for each customer, containing the fields _id, name, info and country ( for all of which the dot notation is customobjects.customers.X. For example, customobjects.customers.name). The content of customobjects.customers is this:
[
{
    "_id" : ObjectId("5a676619c60c00ad00000005"),
    "name" : "Client A",
    "info" : "blocked",
    "country" : "NL"
},
{
    "_id" : ObjectId("5a6766f3ea0c00e300000005"),
    "name" : "Client B",
    "info" : "betaclient",
    "country" : "BE"
},
{
    "_id" : ObjectId("5aa119348761655a34d73a53"),
    "name" : "Client C",
    "info" : "",
    "country" : "BE"
},
{
    "_id" : ObjectId("5aa129a98761655a34d73a57"),
    "name" : "Client D",
    "info" : "blocked",
    "country" : "BE"
}
]
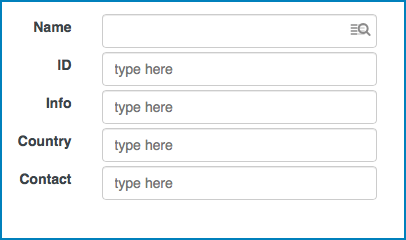
You can use this information in the database to automatically fill in the values of the text fields. To do this, configure the KIOSK parameters the following way:
- Text field Name:
- Type: Auto fill by table
- (variable) Key: name
- Label: Name
- Collection: Custom objects
- Custom object name: customers
- Columns:
Column that will retrieve database information for Name text field Column that will retrieve database information for ID text field Column that will retrieve database information for Country text field Column that will retrieve database information for Info text field Column that will retrieve database information for Contact text field Type: text Type: text Type: text Type: text Type: text Title: name Title: ID Title: country Title: info Title: contact Key (path): name(*) Key (path): _id(*) Key (path): country(*) Key (path): info(*) Key (path): contact(*) Searchable: yes Note: (*) this key needs to be identical to the key of the corresponding text field.
- Text field ID:
- Type: Text
- (variable) Key: _id
- Label: ID
- Text field Info:
- Type: Text
- (variable) Key: info
- Label: Info
- Text field Country:
- Type: Text
- (variable) Key: country
- Label: Country
- Text field Contact:
- Type: Text
- (variable) Key: contact
- Label: Contact
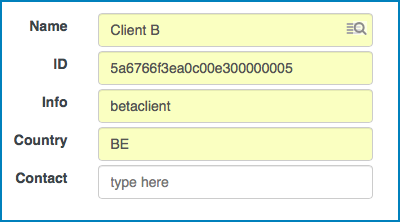
The fields that are changed are displayed with a yellow background color. The field Contact does not receive any value, since the database does not contain an object with the key that corresponds to the key of the text field (contact). The field cannot retrieve information from the database, so it needs to be filled in manually.
Style
- Background color: the background color of the field.
- Font color: the font color of the text in the field.
Form Actions
With Form Actions you can show or hide a field, depending on the value of another specified field.
- Is equal to: here you can specify a value. If the value that is entered in the active field in the form is equal to the value that is specified here, another field is shown or hidden.
- Field: here you can define the field that must be shown or
hidden when the value that is entered in the form is equal to the value that is
specified in the parameter Is equal to. Select
 to select the field
you want to show or hide.
to select the field
you want to show or hide. - Action: here you can define the action that will be performed when the value that is entered in the form is equal to the value that is specified in the parameter Is equal to. Possible actions are show or hide.
Simple example
- Label 1
- Label 2
Label 1 has a configured Form Action:
- Is equal to hide
- Field id2
- Action hide
The result is that Label 2 will be hidden in the form when the value of Label 1 is equal to hidden.