File menu

In the File menu you have access to several Plug-in Suite options.

Note: If you have selected the checkbox Enable Automatic Login in Window > CLOUDFLOW > Preferences, you will be logged in automatically. If you have not selected the checkbox, a login window appears where you need to enter your password and select Login.

Open From Cloudflow

This function activates a window to a CLOUDFLOW File store if a CLOUDFLOW Server connection has been made in Window > CLOUDFLOW > Preferences.

Options:
  • You can display the files in Icon view or List view.
  • You can use the search field at the top right of the window to search for a file in the CLOUDFLOW File store.

Save A Copy To Cloudflow

With this function you can save a file that was not opened from CLOUDFLOW in a File store in CLOUDFLOW.
  1. Browse to the location in the File store where you want to save the file.
  2. If desired, edit the name of the file in the field on top of the dialog.
  3. Select Save.
The file now has a CLOUDFLOW URL and is a CLOUDFLOW asset.

Save To Cloudflow

If you open a file with the function Open From Cloudflow and the checkbox next to Window > CLOUDFLOW > Preferences > Open From Cloudflow is not selected, a copy of the file that you open is copied in the Work Folder and is actually opened from there. In this case, the function Save To Cloudflow allows you to save changes in the original file in the CLOUDFLOW File store as well.

Submit To Cloudflow

If a connection is established in the CLOUDFLOW Server settings in Window > CLOUDFLOW > Preferences, a file that is currently opened in Illustrator can be sent directly to a CLOUDFLOW workflow via the Submit To Cloudflow function.

To submit a file that is currently opened in Illustrator to a workflow, follow these steps:
  1. Select the Workflow you want to submit to.
  2. Select the Input.
  3. If needed, fill in the required form fields.
  4. The tab Host displays the list of all the files that are currently open in Illustrator. For each file, there is an indication whether the file:
    • Is located inside a File store or is located outside a File Store.
    • Has been saved or has not been saved.
  5. Select the Transfer Type:
    • Direct: if you select this option, you interact directly with files inside a File store and that are known by CLOUDFLOW. This option is available in case the checkbox Enable File store browsing is selected in the Start From Kiosk node.
    • Upload: if you select this option, files outside a File store and that are unknown by CLOUDFLOW will be uploaded first. By uploading them, the files are put in a folder that you have configured in the Upload Location field in the Start From Kiosk node. This way, the files will get a CLOUDFLOW path and become known by CLOUDFLOW. This option is available in case the checkbox Enable upload is selected in the Start From Kiosk node.

    Example

    • File 1 has been saved in a File store. You can directly select it from the File store to submit it to the workflow.
    • File 2 has been saved outside a File store. You need to upload the file before you can submit it to the workflow.
    • File 3 has not been saved. You cannot submit it to the workflow.
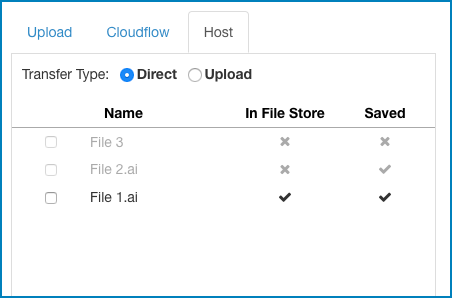
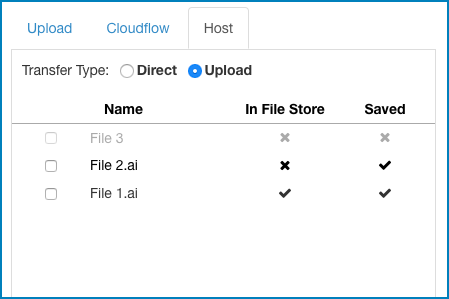
  6. Select the file(s) you want to submit to a workflow. You can select files with a checkbox, but you cannot select files that are not saved.
  7. Select Submit to submit the selected file(s) to the workflow. A jacket containing a workable is created.