EN version
PROOFSCOPE is an application for soft proofing.
What can you do with PROOFSCOPE?
- View files in these formats:
- PDF, JPEG, BMP, CF2 files.
- 3D files.
- 1 bit TIFF files and LEN files.
- Compare different files.
- Approve, reject or delegate files in case of an approval.
View PDF files
With PROOFSCOPE you can view PDF files.
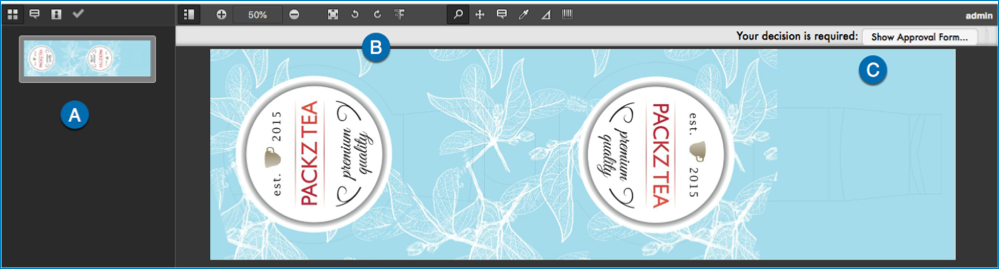
- A: Sidebar.
- B: Toolbox.
- C: Download buttons.
| Sidebar | ||
|---|---|---|
 |
Thumbnails | Gives an overview of the pages. In case you're viewing a multipage file, all pages will be displayed. |
 |
Notes | Gives an overview of the notes.
|
 |
Reports |
Gives an overview of the preflight results of the Analyze node. Select a checkbox to view a specific type of preflight result. The problem area in the design is indicated by a red square. Select the triangle to expand. If you select a specific preflight result, the error becomes green transparent. When zoomed in, the zoom will automatically shift to the error area. |
 |
Separations |
Gives information about the file. SEPARATIONS: the separations to
display. Select Edit... to edit the
separations. You can
SEPARATION OPTIONS
INSPECTION
PAGE BOXES: information about the page boxes. PAGE SIZE: the page size of the design. |
 |
Approval Form | Displays the approval form that is created in the
Start Approval node. In case one or
more fields are required to be filled in, the user cannot
approve or reject the file as long as these required fields are
empty. Note: The Approval Form is only visible when the
checkbox Display Form in the
Start Approval node is
selected. |
 to view notes per
 to view notes per
| Toolbox | |||||||||||||||||
|---|---|---|---|---|---|---|---|---|---|---|---|---|---|---|---|---|---|
 |
Show Sidebar |
Allows to open or close the Sidebar on the left. |
|||||||||||||||
 |
Zoom in |
Allows to zoom in. |
|||||||||||||||
 |
Zoom |
Allows you to enter a zoom percentage. |
|||||||||||||||
 |
Zoom out |
Allows to zoom out. |
|||||||||||||||
 |
Fit |
Fits the complete design in the window. |
|||||||||||||||
 |
Rotate |
Rotates the design to the left or to the right. |
|||||||||||||||
 |
Mirror |
Allows you to mirror the design. |
|||||||||||||||
 |
Zoom |
Allows you to magnify a selected part of the file. If you click, you zoom in, if you ALT + click, you zoom out. |
|||||||||||||||
 |
Pan |
Allows to pan on the design while zoomed in. To pan, hold down the left mouse button and move the mouse. If you selected the Thumbnails view in the Sidebar, the zoom area is highlighted. To move the zoom area, hold down the left mouse button and drag it to another position. |
|||||||||||||||
|
Notes |
Adds notes to the design. There are several types:
After choosing the type, you can write your comment in the Note window. Select Save to save the note. All notes are visible in the Notes on the Sidebar and on the design itself. Select Hide notes to hide them. To open a note, click on the note in the Sidebar or by double click the visualization highlights in the design itself. |
|||||||||||||||
 |
Densitometer |
Allows to measure separations. 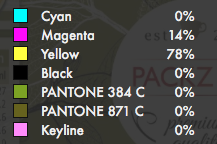
To measure separations, select the exact spot in the design that you want to measure. |
|||||||||||||||
 |
Measure | Allows to measure:
|
|||||||||||||||
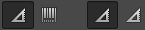
 |
Detect Barcodes |
Recognizes and reads barcodes. To read the type and value of the barcode, drag a rectangle around the barcode while holding down the left mouse button. 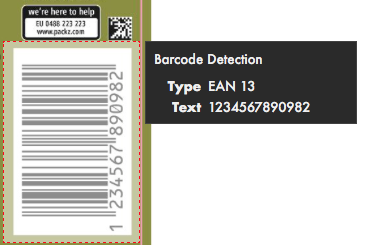
You can select the value of the barcode to copy-paste it to another software tool. These are the supported barcodes:
|
|||||||||||||||


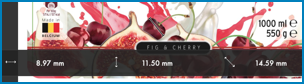
 and draw a line between the
two points between which you want to measure the
distance.
and draw a line between the
two points between which you want to measure the
distance.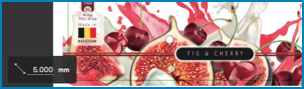
 and define a diameter in
the box on the bottom left. Next, draw a circle in the
file. The diameter of the circle corresponds with the
diameter you have defined in the box. You can move the
circle by dragging it to another position. Everything
outside the circle has a bigger measure than the defined
diameter. For example, this way you will know if a trap
meets a certain distance.
and define a diameter in
the box on the bottom left. Next, draw a circle in the
file. The diameter of the circle corresponds with the
diameter you have defined in the box. You can move the
circle by dragging it to another position. Everything
outside the circle has a bigger measure than the defined
diameter. For example, this way you will know if a trap
meets a certain distance.| Download buttons | ||
|---|---|---|
 |
Generate Report |
Downloads an HTML PROOFSCOPE report. |
 |
Download file |
Downloads the file in low resolution. |
View 3D files
- .ic3d files (IC3D).
- .dae files, which are XML files without graphics or other binary data (COLLADA).
- .zae files, which are compressed files containing the .dae file, a manifest file, graphics... (COLLADA).
Move around the 3D design by holding down the left mouse button.
View screened files
With PROOFSCOPE you can view screened TIFF and LEN files after a RIP process.
| Toolbox | ||
|---|---|---|
 |
Measure Halftones |
Gives detailed information about the screens in a selected
area:
|
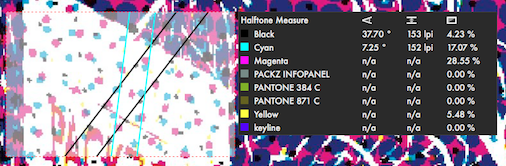
To view/measure an individual separation, deselect all separations except the one you want to view in the Separations view in the Sidebar.
Compare files
| Icon | Description |
|---|---|
 |
Represents the first file |
 |
Show difference highlights the differences between the two files |
 |
Represents the second file |
 |
Switching Files automatically switches between file A and B |
 |
Show Side by Side displays the files side by side |
The comparison can be tweaked with the Differences view in the Sidebar
( ).
).
This option is only available in case you work with different versions of the same file.
- Compare: select this checkbox to compare different versions of the same file.
- Version A: the file that represents the first file (version A).
- Version B: the file that represents the second file (version B).
- Offset X: the vertical offset (in mm) of file B with respect to file A.
- Offset Y: the horizontal offset (in mm) of file B with respect to file A.
- Rotation: the amount of rotation of file B with respect to file A. Options are 0°, 90°, 180° and 270°.
- Reset: reset the options to the default settings.
- Box: the box that will serve as a reference point in case the files have a different position and you want to align them.
Use this option if you want to define a specific reference point on both A and B documents to align them.
- File A: the reference point on file A. Make sure file A is visible, select choose, position the cursor where you want to place the reference point on file A and click.
- File B: the reference point on file B. Make sure file B is visible, select choose, position the cursor where you want to place the reference point on file B and click. Next, select Set or Calculate.
- Set: the designs will be aligned exactly on the two reference points you have defined in File A and File B.
- Calculate: this button will use the reference point you have defined in File A and File B, but will use information of the images (such as colors) to align the designs more exactly.
- Reset: reset the options to the default settings.
- Mode: if needed, select a different view mode to visualize the
differences more clearly. Options:
- Default: the default color mode will display the common pixels in File A and File B in white and the pixels that are not common in red. The pixels that are present in File A and not in File B are displayed in a darker red, the pixels that are present in File B and not in File A are displayed in a lighter red.
- Inverse: the common pixels will be displayed in black and the pixels that are not common will be displayed in red. The pixels that are present in File A and not in File B are displayed in dark red, the pixels that are present in File B and not in File A are displayed in lighter red.
- Hard: the common pixels will be displayed in gray. The pixels that are present in File A and not in File B will be displayed in blue, and the pixels that are present in File B and not in File A will be displayed in red.
- Darken: both the common pixels and the pixels that are not common will be displayed in the original colors.
- Threshold: increase/decrease the threshold to see more/less differences
Assess files
In PROOFSCOPE you can approve, reject or delegate files in an approval workflow.
If a decision is required, a button Show Approval Form is displayed on the top right. If you select that button, the Approval Form is displayed in the Sidebar:
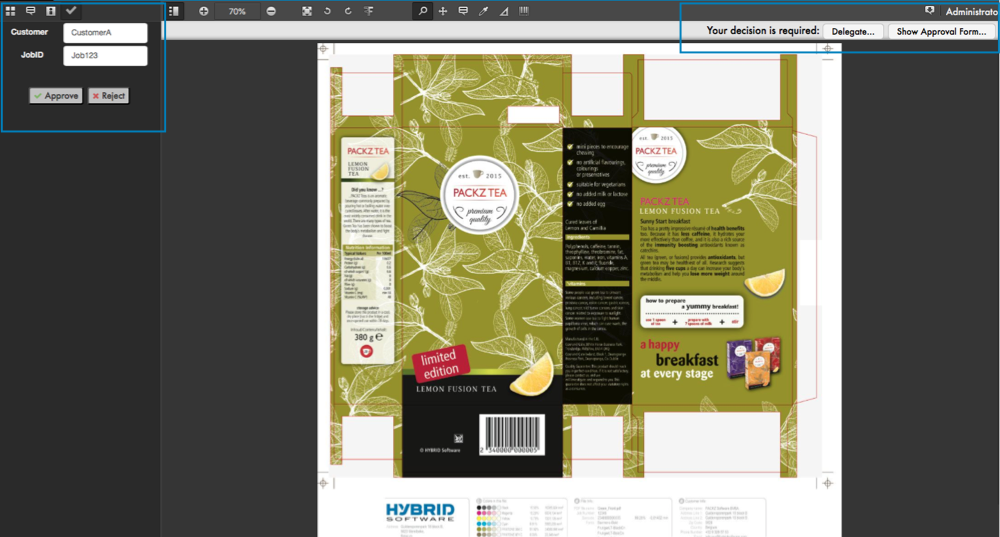
In the Approval Form, you can approve or reject the file.
- Add approver: an extra participant of the approval workflow is added. This participant will receive a link to the file and will also be invited to approve, reject or delegate the file.
- Add informative approver: an extra participant of the approval workflow is added. This participant will receive a link to the file and will also be invited to approve, reject or delegate the file. However, this participant's decision is strictly informative and does not have an influence on the approval workflow.
- Transfer approval: the file is sent to another participant (who is not the initial approver). This participant will receive a link to the file and will also be invited to approve, reject or delegate the file.
- Approver e-mail: here you can enter the participant's email address.
PROOFSCOPE shortcuts
These are the shortcuts you can use in PROOFSCOPE:
| Fit zoom | Cmd 0 | Ctrl 0 |
| Zoom in | Cmd + | Ctrl + |
| Zoom out | Cmd - | Ctrl - |
| Zoom in when in zoom mode | Click | Click |
| Zoom out when in zoom mode | Option + click | Alt + click |